
GMing any game is an art form - requiring imagination and creativity. But when it comes down to it, running a Torchbearer game for the first time can be daunting.
 I love the first scene of Indiana Jones and the Raider's of the Lost Ark, so I thought it'd be fun to turn it into a Torchbearer dungeon. It's a familiar story as a point of reference and serves as an illustration of what to do and what not to do when exploring a dungeon to create an obstacle-to-obstacle adventure (see Obstacle to Obstacle, Scholar's Guide, page 217).
Let's look at some of the thought behind the kinds of decisions a GM might have to face by using insight from the Torchbearer Rulebook.
The Temple of the Chachapoyan Fertility Idol
Thinking about Adventure Difficulty
Since we are going by the movie, this is going to be a solo adventure. However, Torchbearer is a game about teamwork, ideally for 3 - 6 players. Although it can technically be played with just one player, that is not ideal and would be insanely difficult if Indy got injured. You can still apply everything we're going talk about regardless of your party size or dungeon design.
With that out of the way, a number of things will determine how difficult the adventure is for the party. One factor is how far away the town is, but on the first session that's not such a big deal because the party starts with backpacks full of gear, torches, food, and equipment.
An even more important difficulty factor is the rewards and conditions of the characters. With a new party, none of the characters are going to have Persona or Fate, but all of them begin Fresh.
Another thing to consider regarding difficulty are the monsters in the dungeon. Monsters should be rolling roughly the same amount of dice as the adventurers. When designing your dungeon, there should be one challenge or monster that is "too much to handle" (see Difficulty Level, Scholar's Guide, page 137).
Balancing Difficulty for the Party
When Indiana Jones and the Raider of the Lost Ark starts, Indiana Jones is probably Fresh with full, untaxed Nature. We will say he is Level 5 and his Nature is 6 so he can do a lot of "heroic" things (see Channeling Nature, Dungeoneer's Handbook, page 67). He's not quite maxed out of his Nature to 7, which would cause him to retire for good (see Nature 7, Dungeoneer's Handbook, page 70).
He has some unspent Fate and Persona rewards banked, which makes a huge difference. A new GM should be aware that rolls in the first session can be pretty tough without any Persona because you need to spend rewards to tap Nature and get those extra dice.
Starting at the Dungeon Door
If you were running this as a stand-alone adventure, you should use the pregenerated characters (see Iconic Characters, Dungeoneer's Handbook, page 132). For your first session, you should expedite all the beginning lead up by starting right at the door of the dungeon.
Creating characters or Town phase can burn up an hour or more of your session, so if you only have a few hours for the entire game then you had best jump ahead. Get right to the action and keep the momentum going!
However, since this isn't Indy's first rodeo and this is part of a longer, regular campaign, we're going to have him start in town and take it from there.
There's been a good deal of time since his last adventure (time in Town passes in weeks or months), but he gets a new Adventure Hook that he can't turn down.
Adventure Background and Setup
Dr. Forrestal disappears in the jungles of Peru while searching for the fertility idol of Pachamama. Dr. Forrestal is a professor of history and archaeology at Princeton University and a treasure-plundering "competitor" to Indiana Jones.
Adventure Hook
Indiana Jones receives an adventure Lead (a map) from Dr. Forrestal's notes as to the location of the temple.
The GM establishes that the notes on the Treasure Map item provide a +1D bonus to Indy's Scout and Dungeoneer tests related to the traps and perils of the dungeon. The map takes up one slot in Indy's inventory and could be lost as a part of twist.
As a reminder, skill tools not are marked on the inventory sheet, and adventurers carry the minimally necessary tools and equipment to get the job done (see Skill Gear, Dungeoneer's Handbook, page 88). For example, the maps, paper, and ink a Cartographer uses do not take up inventory slots. However, this Treasure Map is an item that is different because it is a piece of gear with mechanical bonuses. It needs to be managed in the inventory, and so, Indy puts it in his satchel.
Town Phase
Indy already possesses the treasure map, a lead, and now, through player agency and roleplaying, the situation arises where the museum makes Indy an offer he can't refuse.
The "Personal Business" Town Action
Indy begins already in a Town Phase from the last adventure. He visits the Guild (of the National Museum) and wants them to foot the bill for his expedition.
Since there is no perfect town action listed in the rule book for such a thing, we are going to use the "Personal Business" town action.
Personal business is a catch-all to resolve actions that the players come up with, and here Indy is using it to attempt to finance a whole journey. Normally, the guilds only offer grunt work to adventurers. For Indy, finding work for the museum might be something like giving a Saturday lecture or cataloging some artifacts in the museum's collection to make a little bit of coin.
However, the GM figures that Indy has done this before and since it is possible, it will be a Circles test to see if Indy has the social connections to make this happen this time around. This should not be impossible (Ob 6) nor too easy (Ob 1), so a reasonable balance is Obstacle 3.
That's an Ob 3 Circles test based upon the listed factors and +1 Lifestyle cost.
Indy's Fresh grants +1D, and also, Indy gets +1D to Circles for being 3rd Level or higher in his Home Town.
Indy passes the Circles test, and the Museum presents an extraordinary deal: paid travel expenses to Peru along with a share of the haul to commission him to retrieve the artifact. The museum also arranges for some locals and pack llamas to carry additional supplies. This is a really sweet deal. No lowly 1st Level adventurer would receive such a generous offer, but Indy is a mid-level adventurer that has built up strong relationships in this Town that are going to pay off.
Hire Help
As a reminder, parties can "hire help" to fill the ranks. A lot of new GMs and players forget about this. NPCs (helpers, apprentices, companions, friends, parents, mentors, etc) never roll dice or test unless the rule book specifies (such as exceptions in Level Benefits).
At the Tavern, Indy Hires Help (see Hire Help, Scholar's Guide, page 110). He arranges for a Guide and a Porter (Lifestyle increase +1 porter and another Lifestyle increase +1 and +3 factor for the guide.
A porter provides "help" to laborer tests, and a porter has 2 free inventory slots and additional carried 2 slots.
A guide provides "aid" to travel tests, and a guide carries a pack with one free inventory slot.
That's two Circles tests: Ob 1 for porter and Ob 3 for guide.
Indy succeeds and makes all the arrangements in town ahead of time to expedite getting to the dungeon.
Lifestyle cost
Indy has to pay up as he leaves town. Since he has a Home at this town, he does not have to pay accommodations. He has a total Lifestyle cost of 5 from the actions he has taken.
He has Resources 3. Note: you cannot spend Fate and Persona Rewards on Resources or Circles tests to get more dice. So, instead, he uses five dice of loot from three Bags of Gold to insulate himself from Resources tax (see Taxing Resources and Protection from Tax, Dungeoneer's Handbook, page 60). Each die of loot insulates Indy from one margin of failure, and each margin for failure would reduce his Resources rating by one.
Indy rolls 8 dice for a Resources Ob 5 test. He gets 4 successes and 4 scoundrels on his roll. He has a margin of failure of 1. Indy decides to accept the failure.
Now, the GM has to decide to give Indy a Condition, Twist, or to apply Resource Tax. Since Indy spent all that gold and made a good effort, the GM decides to go with a twist.
Secretly, the GM chooses a "twist for later." Indy's enemy, the rival archaeologist René Belloq, leaves town just before him and has a head start. The GM informs Indy that, "At the airport gate lounge, Indy sees a strange man pull down his hat to conceal his face as he boards an earlier flight." This twist will setup future events in the dungeon ecosystem, but the players do not yet know how it will impact them.
Indy tries identify the figure, but does not get a good look at the strange man with a hat.
Indy checks his wallet and shrugs at the few bucks he has left (1D of gold left over from all those bags). But Indy is happy: he used all that gold to mitigate taxing his Resources. He's spent a long time building up his Resource ability from his poor teaching salary. Indy heads to the airport to leave town
Alternatively, the GM could have chosen a Condition: Hungry & Thirsty - all that arguing with the custom's agents at the airport (Town Guard) causes him to miss his flight and the delay to the next available flight makes him hungry.
Leaving Town
Indy updates his sheet with a draught of water (not wine) in the Skin slot (see Free Refills, Scholar's Guide, page 118).
Because Indy failed to pass his Resources test, he does not regain any Nature. Characters do not start Fresh or regain Nature if they fail to pay up regardless of the Condition, Twist, or Resource tax from failure.
However, this is a rare instance where Indy already had the Fresh condition from the previous adventure, and so, he retains it because he did not suffer any conditions.
Leaving Town Table
In 2nd edition, players no longer get a free adventure hook when leaving town. The 1st edition Leaving Town table has be removed so that it puts the responsibility for managing adventure leads back on to the players. If the players want or need more adventure leads, they need to spend some time in the tavern or taking town actions to dig up leads.
Adventure Goal
With that settled, the GM asks Indy to set his adventure goal.
Indy writes on his sheet, "Preserve history by retrieving the Golden Idol for the museum."
The adventure begins...
Adventure Planning
Map Prep
New GMs usually start off with an adventure with one map prepared. Again, it's best for a new group to start right at the dungeon, so that's fine to get started.
As Torchbearer GMs gain more experience, they'll find that they can have two or three different adventure concepts (not full adventures) prepared. As you progress, you might find that these concepts are crude maps drawn on napkins at a coffee shop or on the back of a grocery store receipt. This type of approach offers the players more of an "open world" type of gameplay where you can pull one of these ideas out of a hat. Other GMs will use world-building hex maps with populated dungeon encounters or randomly generated tables to create worlds-on-the-fly. However you want to create your world, the point to remember is that players should always be driving.
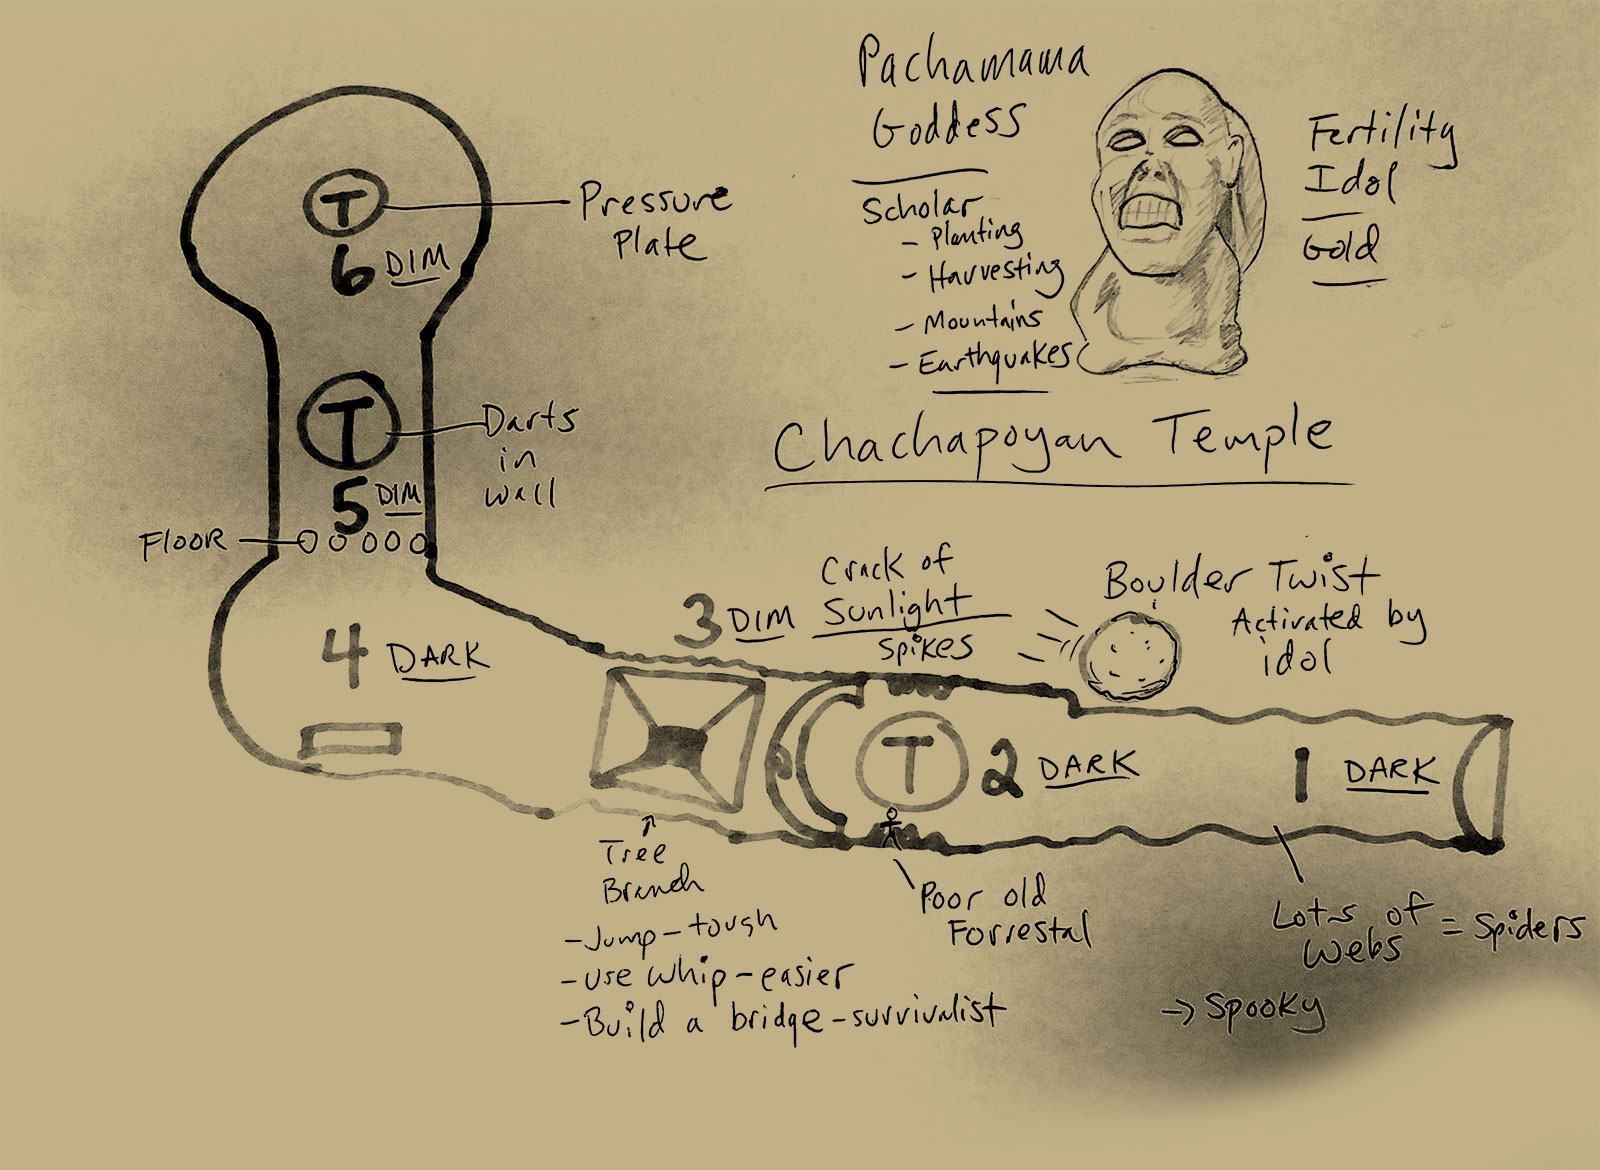
Here I've sketched out a very crude map. I've made it intentionally simple to demonstrate a minimal level of prep for a GM. Only the GM sees the map, so it doesn't have to be beautiful or make sense to anyone else. It's not something that is revealed to the players or that they replicate on graph paper.
For the players, a Torchbearer "map" is a list of locations by a designated mapper for the session (see The Mapper, page 58).
This temple has a small number of areas, which is good for a single Torchbearer session. Tunnels and stairs can be lumped together into one "area." You can think of tunnels as transitions, fades or hard cuts, between scenes in a movie.
Running the Gauntlet
The Chachapoyan Temple is a classic Gauntlet-style dungeon. Gauntlets are about puzzle-solving trials with a big reward at the end. Gauntlets are a legit dungeon design but not very common in Torchbearer.
A first-time GM should go with a smaller Labyrinth-style dungeon because Torchbearer's strengths are exploration and player choices. Also, a Gauntlet requires a lot more preparation to pull off successfully. However, George Lucas and Philip Kaufman made this temple an archetypal gauntlet in the Greek tradition of the "epic, mythic form" to establish Indiana's character as a competent hero… so, yeah, whew!
Adventure Phase Begins
The Adventure begins in the forest of Peru. The GM describes a unique mountain landmark indicating that Indy is getting close to the temple.
Wilderness Area 1: The Jungle's Edge (Bright Light)
Turn 1
GM:
Ahead of you, jagged, jutting canyon walls pierce the dense, lush rainforest of the eastern Andes. Although it is daytime, the path through the jungle is half-hidden by thick mists and overgrown brush.
INDY:
With my map in one hand and my whip in the other, I lead my small group onward, looking for a path or some sign of the temple.
GM:
Your steely-eyed Peruvian guide Barranca and terribly anxious porter Satipo follow closely behind you.
The GM describes a narrow trail that cuts across the face of the canyon. A single-file line of a dozen villagers follow Indy.
Indy narrates walking through the forest while allowing the villagers to wrangle the heavily-packed llamas and donkeys.
GM:
With each step. the villagers grow more nervous. You catch a few words as they mutter in Quechua about some curse. They begin to argue, holding you up.
INDY:
I'll try to embolden them with a stern glance. However, I have no sympathy for their cowardice, and I'm quite prepared to go on without them. I'll use my Heroic trait against myself to earn a check before going into the dungeon.
GM:
That's going to be a Persuader versus test to keep the villagers together.
Indy rolls 3 dice (3 skill + 1 Fresh - 1 for the trait) against Ob 0 and gets one success. The villagers contest Indy's roll using their Will rating of 3 and get 2 successes.
Indy fails, but he gains a check. Now, he can make camp later if he chooses.
The GM goes with a Twist: the villagers and mounts flee in terror.
Turn 2
GM:
One of the villagers pulls back a tree limb to reveal a statue of a Chachapoyan Demon Warrior - a fierce, stylized, snarling face carved in a stone totem. Birds fly from its mouth, sending the villager fleeing in terror. The rest of the villagers take off with the donkeys into the forest. Only your porter Satipo and guide Barranca remain by your side.
INDY:
I think to myself, "We don't need them." As I watch them run off, I tip my stetson to block the rays of sun. Without a word, I turn to continue along the path. I've come too far to turn back now or go chasing after those fools.
GM:
Satipo and Barranca give each other troubled glances but nervously follow behind. As you fight your way through the entwined trees that enshroud the temple, you come upon a dart sticking in one of the trunks.
INDY:
I'll take a quick look, but I'm not going to slow down. I figure the jungle is guarded by a hostile tribe. I pluck the dart from the tree and toss it to the ground.
Indiana could have taken some time to investigate the poison. If he did, the GM might call for another test based upon what the character was going for. But Indy has made it clear he's not really interested. The GM decides to confirm Indy's conjecture. It's important to note that Hired Help never roll on their own and that the GM should avoid playing the help. However, some players are not comfortable playing multiple characters, and, if that is the case, the GM should do what makes sense for the group.
GM:
Indeed, Indy knows the protective Hovitos tribe claims this territory. If they had known you were here, they would have attacked you already.
INDY:
I'll proceed cautiously, like a cool cucumber, trying not to let on to the fear that is slowly gripping my heart.
GM:
Ahead, you can see a deep pool of water fed by a small, cascading waterfall.
INDY:
I'll hold up my map to check for signs of the temple entrance that must be nearby. I'm looking for anything that might show up on my map to pick up the trail.
Note: Indy does not say, "I'm going to use Pathfinder to find the temple." The player never gets to pick the skill. The player always describes what, how, and where they do something, and the GM determines if that triggers the next obstacle or which skill is ultimately being tested. If players struggle to break from this habit, just ask them "how do you..." go about doing whatever it is they were saying. Try to pull out more narration by encouraging detailed descriptions.
Now, the GM calls for a Pathfinder test Ob 3.
Indy rolls and fails.
The GM contemplates giving a Condition for the failure. However, the GM decides to keep tossing more twists in Indy's way.
The GM goes with a Twist: Barranca seizes the moment to betray Indy.
Turn 3
GM:
You double check the notes regarding the temple entrance. You're quite certain that the entrance is atop a mound beyond the stream that feeds the waterfall. But, as you pour over the notes on your map, you notice, out of the corner of your eye, Barranca quietly draws his pistol behind you. You can hear the tell-tale sound of the hammer pulling back to cock the gun.
Indy describes how he uses his whip. He doesn't want to kill the guide, so he narrates disarming the gun with the whip.
The GM determines this is not a conflict for a few reasons. First, Indiana's skill far surpasses the Guide's, and this is not a contest where the outcome is uncertain. Second, this is a twist which is designed to slow Indy from reaching his goal but it is not a defining moment to be played out in a series of actions. Third, the GM has the discretion to manage the balance and the pacing of the adventure. A simple Fighter test is best in this instance.
The GM describes the guide raising up his gun and calls for a Fighter test vs the Guide's Fighter skill.
Indy gets +1D for the whip plus +1 Fresh, and rolls 3 successes.
The guide rolls 1 success.
Indy wins.
INDY:
With rehearsed ease, my move is graceful and precise. I'll whirl around and let my whip flash out in one fluid motion.
GM:
The fall of your whip wraps around the pistol.
INDY:
I'll give a slight jerk and pull the pistol away.
GM:
The gun snaps out of Barranca's hand, discharges as it hit a rock, and falls into the water. Knowing the jig is up, Barranca turns tail and books out of there.
INDY:
I scoff and shake my head. I'll make my way toward the mound.
Turn 4
Indy decides not to chase after the guide. If he decided to catch up with him, that might be a Chase or Capture conflict based upon the player's stated objectives.
Wilderness Area 2 Waterfall and Entrance to the Temple (Bright Light)
GM:
With the aid of your trusty map and your not-so-trusty porter Satipo, you find a dark cave entrance nestled in an earthen mound.
A lot of players will look for alternative ways into a dungeon. I always try to reward players for creativity in terms of finding different ways to get into the dungeon, but don't let the players push you around. If they come up with something plausible, then let them find out if it works. Here, however, Indy sticks to the map.
Indy goes into the slots of the Porter's inventory to pull out a small sack. Porters have 2 free slots but otherwise are just +1D help for Indy's Laborer tests.
Indy describes how he fills one of the sacks up with sand. Based on Forrestal's notes, he has an idea of some of the traps that he might be up against.
The GM acknowledges that Indy has filled up the sack, reminds him to mark that on his inventory sheet, and asks what he does next. The GM chooses not to call for a Survivalist test because there is nothing obstructing Indy from completing such a mundane action.
Indy narrates lighting a torch and hands it to his porter to carry. Again, no Survivalist test is required at this time given the situation. The GM places a Torch card on the table and updates the light tracker (or however you want to manage recording light turns remaining).
They ditch their backpacks and enter the dungeon. Leaving backpacks behind can be very risky. In this case, Indy is taking a huge risk, but, knowing what he is up against, he doesn't want that extra factor to his dungeoneer tests from carrying a backpack. A GM should make a note to use such an opportunity for twist fodder if appropriate and if the circumstances allow. Never take something away from the characters unless it is a consequence of failed actions or a compromise from a conflict. However, it is fair to be harsh as the result of a twist.
INDY:
Ever-cautiously and with constant analysis, I proceed into the cave entrance.
Dungeon Area 1: The Boulder Chute Tunnel
The GM describes a dark, long, straight tunnel filled thick spider webs.
Indy doesn't know there is a boulder in the ceiling of the room. This obstacle is only activated when the idol is missing. There is no obstacle here yet, so the GM continues to build suspense and pressure to keep the action moving toward the next obstacle. However, the GM foreshadowed something sinister by mentioning "a long, straight tunnel." Experienced Torchbearer players will pick up on these subtle keywords.
The GM continues with more description of the area now that Indy is moving further into the tunnel. He mentions how the tunnel has a slight incline and how the interior plant life is slightly wet. The real obstacle is how his porter is covered in scores of tarantulas.
Indy narrates how he uses his whip to gently remove the spiders.
The GM calls for a Will test Ob 3 to calmly execute the maneuver.
Indy decides to use his Nature because he really wants to pass this test. Because the action is outside of his Nature descriptors, his current Nature will get taxed even if he succeeds. Any additional failures will also reduce his Nature. Indy spends a Persona point to tap his Nature.
Indy's Will is 4, +1D Fresh, plus the six dice for tapping Nature gives him 11 dice.
Indy rolls and succeeds.
Indy's current Nature is now 5.
The Grind hits. Indy loses the Fresh condition. The GM puts a Hungry and Thirsty card on the table next to Indy's character sheet. So, Indy loses Fresh and also gain Hungry and Thirsty as a result of the Grind.
INDY:
I'll finish off my water skin to quench my thirst.
Indy updates his sheet to remove the water, and the GM removes the Condition card from the table.
The GM updates the Torch light counter. There is one more round of torch light left.
Note: many GMs use a Turn Chart and keep counting continuously instead of resetting the count to one. The GM will put a stone on the chart for Turn 5 and keep going. In Virtual Tabletop systems like Roll20.net, you can use the built-in Counter Tool to count remaining turns and light rounds. However you want to count doesn't really matter - whatever makes sense.
Turn 5
Dungeon Area 2: The Hall of Shadows and Chamber of Light
The GM describes the end of the dark, root-filled tunnel. The men reach an arch in the hall. There is a crack in the ceiling with a bright beam of light piercing through the darkness.
Now, Indy is quite certain this is a trap. Indy narrates how he draws upon his knowledge from the map. He's been expecting something like this.
INDY:
I tell Satipo, "Stop. Stay out of the light." Crawling on my hands and knees, I take great pains to avoid the light. However, once I make it past the crack in the ceiling, I will try to disarm the trap by Thoughtfully considering what to do. Once out of the way, I'll then hold my hand up into the light to trigger the trap.
The GM calls for a Dungeoneering test Ob 3. Indy gets +1D for using his Trait and +1D for using the map.
Indy passes. The trap is disarmed.
GM:
With a thunderous clang, giant spikes spring together from the side of the tunnel. Impaled on the spikes, the remains of well-dressed man in adventuring garb slowly retract with the spikes.
INDY:
I mutter, "Forrestal…"
GM:
Satipo howls continuously in terror.
With the obstacle clear, the party is due some loot. However, the adventure map has noted that there are only wet leaves, bones, and a large sack in this area. When the map specifies treasure, the adventure leader does not roll on the loot tables. If a character searched for treasure, the GM would not call for a Scout roll. The party has earned the loot already by dealing with the obstacle in the area. However, Indy could care less about the debris and pushes relentlessly onward.
Turn 6
Dungeon Area 3 The Pit
Indy lights another torch, marks it off his sheet, and proceeds. The GM updates the light counter.
GM:
A wide, uncovered pit covers the width of the tunnel. A thick tree branch crosses the pit above in a canopy of foliage.
INDY:
I'll use my whip to get the two of us across. I'll go first and then send the whip back so Satipo can follow.
GM:
OK, that'll be a Dungeoneer test Ob 3 for both of you.
Indy rolls and fails.
The GM goes with another twist and describes how Satipo is stuck hanging over the pit.
Turn 7
Indy acts quickly and grabs him.
GM calls for a Health test to pull him back.
Indy Succeeds
GM:
Satipo is incredibly relieved to be on the other side of the pit. He flashes a nervous smile that provides little comfort to either of you.
INDY:
I'll leave my whip here so that we can cross over the pit more easily on the way back.
GM:
There's plenty of vines and branches hanging down from the tree canopy in the ceiling.
INDY:
I'll drape it over a vine and continue forward - always looking for the next trap.
Turn 8
Indy lights another torch to keep them fully illuminated in Bright light.
Dungeon Area 4 Foyer and Dart Trap
The GM describes a foyer with golden ritual implements. The foyer connects to a long passage with clumps of mud and leaves on the ground. Then, the GM lets Indy know that the golden idol is shimmering in the light just beyond this hall.
Indy ignores the treasure in the room to dramatically play against his belief. Indy is focused solely on the idol and nothing will distract him.
Indy knows this next area must be a trap.
INDY:
I crouch down to the floor. I'll read over the notes for this chamber to see if I can glean any clues. Then. ever-so-carefully, I look at the clumps of mud for some sign of a trap.
The GM calls for a Scout test to detect the Dart Trap.
Indy receives +1D from his map and passes.
GM:
You notice inlaid in each stone of the floor is an oval pressure plate. Then, you see holes in the wall that line up with each plate in the floor. The holes are just big enough for something small, like a dart, to shoot out.
INDY:
Staying an arm's length away, I take the torch and tap the oval tile to show Satipo the danger.
GM:
A dart whizzes past you into the side of the torch. Satipo points to the wall nearby, noticing the recessed hole and gasps.
Turn 9
The GM places the Hungry and Thirsty card on the table, and Indy nibbles on a portion of preserved rations from his satchel while he surveys the chamber. The GM removes the Condition card.
Indy chooses not to disarm the trap because he figures it would be nearly impossible. Instead, he uses the knowledge to tip-toe across the floor.
GM:
That's a Good Idea! And, by taking your time, you carefully make your way across the tiled floor to the hallowed sanctuary of the Pachamama idol.
Dungeon Area 5 Statue Sanctuary
The GM describes the golden idol on the stone pedestal. This is one of the most iconic scenes in western cinema!
Indy narrates how he is all alone, and he waves off Satipo. This is the moment he has been waiting for. He tries to determine the weight of the statue and narrates using his Loner trait to recall the lore about the idol.
The GM calls for a Lore Master Test.
Indy succeeds.
The GM confirms that Indy has detected the pressure plate trap on the pedestal. The GM tells Indy how the tribe's priests must have hidden the idol here and that it appears to have been untouched ever since.
Turn 10
Indy narrates taking the bag of sand from his satchel, approximates the amount of sand, and pours it out onto the floor.
Indy:
I take a calm and collected breath and stretch out my shoulder muscles to limber up. Then, I swap the bag for the idol.
The GM calls for Criminal test.
Indy fails.
The GM triggers the trap.
The GM describes the whole temple rumbling, shaking, and collapsing.
Turn 11
Indy makes a run for it. Indy's torch fizzles out, but he is in Dim light which increases all appropriate Ob by a factor of one. There is no time for him to light a torch safely. If he wanted to light a torch, now would be one of those times to have him test Survivalist to see if he can pull that off while running. Spoiler alert: he wouldn't.
Since the wall dart trap obstacle was already dealt with, the GM decides to keep the pressure building toward the next obstacle.
GM:
Darts whiz all around you. Rushing madly, you round the corner. Satipo swings across the pit using your whip. He makes it just as the whip comes undone from the tree limb, leaving you without safe passage. He calls out to you, "No time to argue. Throw me the idol, I throw you the whip!"
Indy reluctantly tosses it to Satipo.
The GM describes Satipo's betrayal as he drops the whip to the ground. The door to the tunnel arch is closing slowly. There's little time left!
Indy grimaces and makes a heroic leap. Indy is using his Heroic trait.
The GM calls for a Health test.
Indy succeeds.
Indy gets his whip back and slides under the closing door just in time. If he failed, Indy might have lost the whip as a Twist.
Turn 12
The GM describes the vined landing, and how the treacherous Satipo has been impaled by the spike trap.
Indy picks up Satipo's torch and the idol. That's Indy's last torch. He then moves quickly while avoiding the beam of light from the arch.
The GM describes the rumbling getting louder and how the whole temple is falling apart right behind him.
Indy rushes toward the exit.
Here the GM pulls out that foreshadowing and describes "a long, straight tunnel" leading out of the temple. The boulder comes barreling toward him.
INDY:
With the idol pressed firmly against my chest, I run with everything I have left to muster.
The GM calls for Dungeoneer test and Indy taps his Nature. Since one of his Nature descriptors is "Running," he will not tax his current Nature. Indy spends a persona and adds his current Nature to his roll.
The GM could have chosen to make this a conflict to build up the ending. A Conflict is an important action scene where the characters risk it all. However, since Indy is the only party member, drawing out the scene through a series of sequences doesn't quite fit. If there were two or more characters, this would make a great conflict where the team coordinates their flight without tripping over each other.
Indy succeeds!
You reach the end of the tunnel, the boulder is just behind you now.
INDY:I dive out of the passage, with my hat flying off my head.
GM:
The boulder slams into the opening of the entrance. It is a perfect fit for the passage, and it seals the temple shut… perhaps forever!
Ending the Adventure
In Torchbearer, it is best to end a session cleanly. We know from the movie that there is another scene where Indy runs for the airplane, but the GM decides it's a good point to call an end to the session. Ending in a camp is ideal, but if you run out of time, your next best option is to call an end without a cliffhanger.
When you end the session, always give the players their rewards!
Other Words of Wisdom
If you have words of wisdom for GMs, please post in the comments below, and I will update this post with your advice.
Game on!
Koch
EDIT 1/15/2022
- Updated the article for 2nd edition and revised recommendations and guidance to align with the new rules.