
Boss Monster battles offer interesting challenges for players and GMs. Players have to strategize a little differently and GMs have to juggle a few more pieces. Let's look at what these special rules can offer...
Use Boss Monster battles to raise the stakes for important conflicts (the climactic battle against the evil wizard) or just when you want a mixture of monster types (some orcs and goblins for example).
In terms of tactics for a Boss Monster conflict, the main difference is that the boss monster will most likely be the last enemy out of the conflict. This means that if that enemy has spells, a devastating weapon, or powerful specials, there is no way to eliminate that threat until all of the minions are defeated first. For more info on Boss Monsters, check out page 151 of the Torchbearer rulebook.
Here is a brief summary:
- Can be used in a conflict of any type or outside of a conflict too (Boss Monsters aren't only for conflicts).
- Contains two or more types of enemies or monsters.
- One enemy is the boss. All the other enemies are the minions.
- The boss can, and usually does, receive most of the hit points.
- Each minion can receive one or two HP of disposition as the GM sees fit.
- Generate enemy hit points using the boss monster's conflict disposition plus one for each minion helper.
- The boss can allow the minions to take the "hit" instead - meaning, the boss passes his hit down to a minion so that it takes damage (and uses its armor).
- The boss can act as often as desired in the round so long as it doesn't act twice in a row (unless it's the last one standing). Most often the boss might act on turn 1 and 3 of a round, but it could act just once per round.
Who's the Boss?
The "boss" does not have to be some huge, King Koopa-sized lizard or a power-mad wizard - it could be a few orcs as the boss with some goblin minions. In another group, one or more hobgoblins could lead some orcs and kobolds. There's no limit to the number of monster types you can combine, but, generally, 2-4 is reasonable - it all depends on the actual monster types and what makes sense for the situation.
The Battle in the Chamber of Records
To talk about and demonstrate some points about boss battles, let's examine a scene from the Lord of the Rings movie as a familiar point of reference. There's a whole bunch of battles we could look at from the movies, but one of my favorites is the cave troll fight at Balin's Tomb in the Chamber of Mazarbul.
What is nice about this fight is that it is very cinematic - each character gets a moment to shine, while everyone else is taking some action elsewhere. All of that works well for the abstraction of conflicts in Torchbearer.
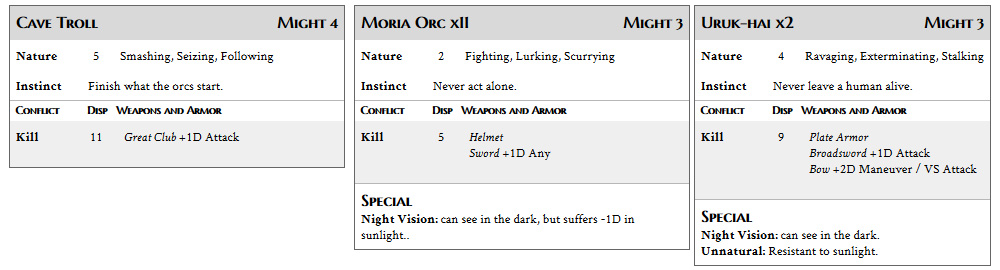
Cave Troll Forces
In this example, we're going to have one, big baddie: the cave troll. He is going to be supported by some orcs and a couple of armored Uruk-hai minions.
The Fellowship Forces
On the side of the forces of good, the conflict captain will be Gandalf. Gandalf realizes they are trapped and makes the decision to stay and fight to the end rather than try to flee through the orc horde. This will be a Kill Conflict, so obviously, using Aragorn's fighter skill would have granted more dice to roll disposition, but there is more to being a conflict captain than just hit points. The party trusts Gandalf's judgment as he has been leading them through Moria.
Gandalf is joined by Aragorn (level 6 Strider from Wander's, Outcasts & Exiles), Boromir (level 5 Warrior), Legolas (level 4 Elf), Gimli (level 3 Dwarf), Frodo Baggins (level 1 Halfling), Samwise Gamgee (level 1 Halfling), Meriadoc Brandybuck (level 1 Halfling), and Peregrin Took (level 1 Halfling).
The Tomb
We begin with the party in the vast chamber of Balin's tomb in Moria. Gandalf reads the runes on a stone slab, and it as he has feared: Balin is dead.
As a Twist for Pippin's Scout test, he knocks a precariously balanced skeleton into the well.
GANDALF
I scold and chastise Pip, "Fool of a Took! Throw yourself in next time and rid us of your stupidity!"
GM
From the depths of the caverns below, you hear a drum beating… growing louder… a great horn answers, followed then by harsh cries. Sam notices a strange glow emanating from Frodo's belt.
SAM
"Mr. Frodo!" I cry.
FRODO
I'll check my sword - pulling it from the scabbard just enough to see the blade.
GM
A cold, blue glow radiates from Sting.
FRODO
I draw my weapon to show the others, unsure of what truly may come.
LEGOLAS
"Orcs!"
ARAGORN
I spring into action and bellow, "Get back! Stay close to Gandalf!"
GANDALF
I'll usher the hobbits together and give them some last minute fighting advice. We will form ranks, and I will defend them. This is where we will make our stand. There's no running away from this.
BOROMIR
I'll peak my head out the door to take a quick look at what we are up against.
GM
You see something large and lumbering… towering over a huge wave of orcs.
BOROMIR
Uh, yeah, I'll quickly shut the door.
GM
An arrow whizzes by your head just as you slam the door shut.
LEGOLAS
I'll toss some axes to them to hold the door.
BOROMIR
I swipe the axes from the air, wedge them into the door, and turn to Aragorn. With a look of dismay, I mutter, "They have a cave troll."
GIMLI
I snatch up two rusty dwarven axes and leap onto the tomb.
GM
The orcs are outside now! Pounding and bashing the door down.
GIMLI
I call out, "Let them come! There is one Dwarf yet in Moria who still draws breath!"
GM
OK, confirming that you are planning to make a stand here?
The group agrees and readies for battle!
GANDALF
With these hobbits, we aren't going to outrun them. Yes, this may be the end for us or them.
GM
OK, this will be a Kill Conflict. Death is on the line. If you lose the conflict with any compromise that means a character shall snuff it.
GANDALF
I'll make sure no one is still wearing their backpack, and then I let loose a battle cry to inspire the others.
GM
OK, yeah, your packs rest against the back wall and will not be a factor in the conflict. Your cry is met with the door bursting open - scattering wood fragments through the air. Orcs charge into the tomb, followed by a huge cave troll!
Who will be your Conflict Captain?
Conflict Captain
The conflict captain chooses and distributes the actions for each round. The captain does not have to be the adventure leader. The group unanimously selects Gandalf for his wisdom and leadership.
Often, it is best to select a conflict captain that has a good handle on conflict strategy, tactics, and a knowledge of the strengths of each character. Each round, the other players can table talk and help to strategize or offer suggestions based upon weapons or spells available, but the conflict captain can choose to ignore all of those suggestions. The captain selects the action cards privately and can assign characters to any action or order. Choose your captain wisely!
Disposition
Fellowship
The party now rolls Disposition. Gandalf has Fighter 3 and gets to add his successes to his Health of 4. All eight of the rest of the party possess the Fighter skill, so he gets +8D help. He also throws in his Defender trait for another +1D.
Gandalf spends a Persona to Tap his Nature for an additional +5D. Gandalf is acting outside his Nature, so he is taxed by 1. His current Nature goes down from 5 to 4 now. He can't fail the disposition roll, but any time you tap Nature outside of your Nature descriptors your current Nature is taxed one.
He rolls 17 dice and gets 10 successes for a Disposition of 14.
- All nine of the party gets 1 HP, but Aragorn, Boromir, Legolas, Frodo, and Sam have 2 HP.
Cave Troll
The cave troll has a Kill Disposition of 11. Since it is a listed conflict type, each of the monster helpers add one to the Disposition (without rolling anything). That adds +13 for a Disposition of 24.
- The eleven Moria Orcs gets 1 HP
- The two Uruk-hai get 2 HP
- The Cave Troll gets 9 HP
Boy, Aragorn and Boromir are going to have to kill a lot of orcs!
Round 1
The GM declares swords for the orcs and a club for the cave troll. The orc swords will be used for +1D Attack. The players can glean a little bit of information from the acting monsters and weapons declared by the GM. For example, if the GM had announced bows for the Uruk-hai, you could bet that they were going for a Maneuver.
Gandalf discusses with the rest of the party what weapons and actions they are thinking. Since Aragorn, Boromir, and Legolas have that extra HP, Gandalf suggests leading with them. Legolas suggests that the Cave Troll might act on action 1 and 3 and that his bow might mitigate one of those actions.
The players choose weapons after the GM. The players declare a battle axe for Gimli, a sword for Boromir, and a bow for Legolas. Boromir establishes he is using his sword to provide +1D Attack. Boromir also has the Level 5 Warrior "Agile" level benefit which grants an additional +1D help during the conflict.
The GM puts the monsters' three action cards on the table.
Gandalf goes for a risky but classic Attack - Attack - Attack. He is counting on Gimli's armor to protect him and Legolas' bow to give them the advantage. If Gimli is taken out in the first action, he plans to follow up with a Defend in Round 2 to bring him back. Gandalf reckons that their first priority is cutting down those 13 helpers for the troll.
#1 Gimli Attack vs Orcs' Maneuver
Gimli flips over his Attack action card. The GM reveals an orc Maneuver. The orc has a helmet and sword.
GM
The orcs rush to surround Gimli.
- This is a VS action. The higher number of successes wins by a MoS.
- Gimli gets +9D help from the party, +1D for mustering his Steadfast trait, and spends a Persona to use his Avenging Grudge Nature to add +4D. Gimli is acting within his Nature. If he succeeds, there is no tax. If a character fails, regardless of whether it is within or outside Nature, Nature is taxed by the MoF. Tapping Nature in a VS test is risky. If his current Nature is reduced to zero, his permanent Nature is then reduced. Gimli could seriously lose a lot of Nature here, but with death on the line, he is not taking any chances. He is going all out for the success.
- The Orc has 2D Nature with +13D help. His sword is assigned to Attack, so he gets no bonus for this action.
- Gimli rolls 7 successes against the Orc's 5.
- Since Gimli wins, he gets +1s for his axe.
- These orcs have helmets, but only the acting orc gets to apply his helmet with a -1s.
- 2 HP of damage takes out two orcs.
GIMLI
I duck a blow and immediately bury my axes in two orc helmets.
#2 Boromir Attack VS Orc's Attack
The player flips over his action card. The GM reveals the next action is an Orc Attack.
GM
Now, more orcs flood through the door with their swords raised high.
BOROMIR
With Aragorn and the others at my side, I fearlessly wade into the mass of orcs.
GIMLI
I hew the legs from under another orc that springs up on Balin’s tomb.
Gimli describes his help. He continues his narration regarding holding his position on the tomb. When helpers describe the helping action it does not literally have to involve or interact with the acting character. You can describe any help that pushes your party toward the goal - in this case killing orcs. In this situation, anything from anywhere that takes down more orcs is "help."
The other characters similarly describe their help.
- Attack / Attack is an Independent action. Both sides could do damage.
- Boromir has Fighter 6, gets +8D help from the party, +1D for mustering his Fearless trait, +1D for his sword.
- The Orc has 2D Nature, plus +11D help, and +1D for the sword.
- Boromir rolls 4 successes against the Orc's 3.
- The orc's helmet grants -1s.
- Boromir's chain grants -1s, and he rolls a 4 so his armor is not damaged.
- Boromir's helmet gets smashed as it absorbs -1s.
- Boromir takes 1 HP of damage.
- 3 HP of damage takes out three orcs.
#3 Legolas Attack VS Cave Troll Attack
Legolas flips over his attack action card. The GM reveals the next action is the Cave Troll.
Since the Cave Troll is the boss monster, any damage that would go to the troll can instead take out minions. This ability to distribute HP damage keeps the "heavy" boss enemy in the conflict.
GM
An orc pulls on a long, iron chain to pull the cave troll into the chamber. He swats his master away with his club and chokes up on the chain.
- The bow turns this into a VS action. The higher number of successes wins by a MoS.
- Legolas has Fighter 6, gets +9D help, +1D for mustering his Agile trait, and spends a Persona to use tap his Nature to add +4D. Again, when tapping Nature outside your Nature descriptors, your Nature is taxed by 1 if you succeed on the roll. Your Nature is taxed by the margin of failure if you fail the roll. Legolas is acting "heroically" and outside of his elven Nature, so his current Nature is reduced from 4 to 3.
- The Cave Troll has 5D Nature, +8D help, plus +1D for the club.
- Legolas rolls 6 successes against the Cave Troll's 8. Legolas cannot afford to lose, so he spends a Persona to use his Sharpshooting-Wise to re-roll all his scoundrels. Legolas takes careful aim, and he gets 7 more successes for a MoS of 5.
- The Cave Troll applies the hit to the Uruk. The Uruks have armor, but, normally, armor on overflow damage passed down from the acting character cannot absorb hits. However, in a Boss Monster battle, the Boss ignores the rule that says the acting character takes the hit. Since the Uruk is taking the hit, one of them can use the armor to absorb -1s. That 5 HP of damage becomes 4 HP of damage. The second Uruk receives the overflow damage and cannot use his armor to soak any further damage. So, by choosing the minions to take the hit, the Cave Troll loses 2 helpers instead of 5.
GM
The cave troll is going to apply the damage to the Uruk-hai orcs. That's 4 HP after the armor and that takes them both out.
LEGOLAS
I desperately shoot my bow in rapid succession. Two arrows find a gap in the orcs' armor and pierce their throats.
Round Two
The GM declares swords for the orcs and a club for the cave troll.
Gandalf figures that the Cave Troll may act on action #2 or #3 this turn, since the Cave Troll is subject to the same rule that it cannot act twice in a row during the conflict (unless it is the only enemy remaining). Gandalf wants to setup Aragorn for a big hit on the 2nd action. Gandalf doesn't know when the Cave Troll will act exactly, still, he reasons that kicking off the round with a Maneuver to Attack is solid regardless.
Gandalf has been avoiding using the hobbits, but they must have a turn before Legolas can act again. Putting Sam on the third action is very risky. If the troll acts on action #3 against Sam, it could be a total party wipe, but Gandalf doesn't have a lot of other options.
Gandalf uses his Staff so he doesn't get a penalty for being weaponless, Aragorn uses his sword and a dagger in his off hand, and Sam will use his sword. Maneuver - Attack - Attack.
As a Level 6 Strider, Aragorn has a Level Benefit called Sword Mastery that will give him +1s on Attack, and he declares +1D Defend for the other part of his level perk. He chose Defend so that, if he gets to act again later this conflict, he can restore HP for the party's disposition.
#1 Gandalf Maneuver VS Orc Attack
Gandalf flips over his Maneuver action, and the GM reveals an Orc Attack.
GANDALF
I clutch my sword and join in the battle! I will push against the orcs to drive them toward Aragorn to finish off.
- This is a VS action. The higher number of successes wins by a MoS.
- Gandalf has Health 4, gets +9D help, and spends a Persona to use tap his current Nature of +4D. If the roll fits within your Nature, you are not taxed, however, this action is outside of Gandalf's Nature. If he wins, his Nature is taxed 1, if he fails, he is taxed by the MoF.
- The Orc has 2D Nature, +6D help, plus +1D for the sword.
- Gandalf rolls 8 successes against the orc's 4
- The Orc's helmet doesn't help here - it only applies against an Attack or Feint action.
- With a MoS of 4 on Gandalf's maneuver, he chooses to Impede and Gain Position. That is a MoS cost of 3, but there is nothing else he can assign. You may buy multiple effects, but each effect can only be assigned once. You could not purchase four Impedes, for example.
#2 Aragorn Attack VS Cave Troll Defend
Aragorn eagerly flips over his Attack action. The cave troll is going for a defend to bring back some orcs into this conflict.
GM
The cave troll sweeps his club at Aragorn attempting to keep Aragorn away from the orcs so that they can regroup.
ARAGORN
There will be no mercy today!
- This is a VS action. The higher number of successes wins by a MoS.
- Aragorn has a Fighter of 6, gets +9D help, and uses his Grim-visaged trait to lash out at the troll like a brooding, pouty-lipped, scowling teenager for +1D. He also gains +2D Gain Position from Gandalf's previous Maneuver.
- The Cave Troll has 5D Nature and +6D help. -1D from the Impede effect.
- Aragorn rolls 8 successes and explodes his three 6's for 10 total successes.
- The troll rolls 5 successes.
- Aragorn gains +1s from his Strider Level Benefit dealing 6 HP of damage.
- The Orc that takes the hit can use his helmet to reduce the damage by -1s to a total of 5.
- Aragorn takes out 5 more orcs.
#3 Sam Attack VS Orc Attack
Sam nervously flips over his Attack. The GM reveals an Orc Attack.
SAM
Oh no! Well, it is better than facing the cave troll, I guess.
- Attack / Attack is an Independent action. Both sides could do damage.
- Sam has Fighter 2, gets +9D help from the party, and +1D for his sword.
- The Orc has 2D Nature, plus +1D help from the Cave Troll, and +1D for the sword.
- Sam gets 2 successes. He doesn't have a wise he can use to re-roll those scoundrels.
- However, the orc only gets 2 successes as well.
- Sam is facing 2 HP of damage, but his leather armor absorbs -1s.
- The orc's helmet provides it with -1s to the damage it is facing, but it is not enough to save it.
- Sam takes 1 HP of damage but is still hanging in there.
- 1 HP of damage takes out the final minion.
GM
Sam gets a scratch on his scalp.
SAM
That's OK, I'm elated to still be alive. I announce to the others, "I think I'm getting the hang of this!"
Round 3
This is the moment Gandalf has been dreading. He has to play the hobbits, and now the Cave Troll gets to act on every action. This is a pretty bad situation, but at least all of the helper minions have been eliminated.
The troll is using his club and the hobbits their swords.
Gandalf plays it safe with Maneuver - Maneuver - Defend. He just wants the party to survive this round.
#1 Frodo Maneuver VS Cave Troll Attack
Frodo plays his Maneuver action against the Cave Troll's Attack.
GM
The Cave Troll lunges forward, thrusting at Frodo's chest.
FRODO
I look around for my protector and call out, "Aragorn! Aragorn!"
SAM
Oh, bother, this is my worst nightmare. I scream in disbelief and horror.
- This is a VS action. The higher number of successes wins by a MoS.
- Frodo has a Health of 3 and gets +9D help. He doesn't have any Persona to Tap Nature.
- The Cave Troll has 5D Nature and +1D for the club.
- Frodo rolls 3 successes. Without any rewards to re-roll dice, that's all he can do.
- The troll rolls 5 successes. With its higher Might, that becomes a MoS of 3.
- Frodo has unique dwarven armor that not only reduces the damage -1s like all armor but also has a special ability. His armor is not damaged.
- Frodo has 2 HP, and he takes 2 HP of damage. He may be knocked out of the conflict unless his armor's ability kicks in.
GM
Frodo is lifted off his feet by the cave troll and slammed against the wall.
ARAGORN
I can't believe it. "Frooooodooooo!"
GM
However, Frodo's armor has a special ability. Frodo, roll 1d6 to see if it is activated.
Unknown to the others, Frodo has dwarven Mithril armor that acts somewhat like the Warrior's Stubborn level benefit. When all his HP is lost, his Mithril Armor has a chance to return him to combat with 1 HP.
Mithril Mail Shirt: Use once per session: If your hit points are depleted to zero, on a roll of 4-6, instead reduce them to 1.
Frodo rolls a success. He will live to see another day.
#2 Merry Maneuver VS Cave Troll Attack
Merry plays the Maneuver assigned to him by Gandalf. As suspected, the GM reveals an Attack for the troll.
- This is a VS action. The higher number of successes wins by a MoS.
- Merry has a Health of 3 and gets +9D help. He doesn't have any Persona to Tap Nature.
- The Cave Troll has 5D Nature and +1D for the club.
- Merry rolls 8 successes.
- The troll rolls 2 successes.
- Merry has a MoS of 6 and buys all three effects.
- The Cave Troll's club has been disarmed.
When a monster is disarmed the weapon cannot be used for the rest of the conflict. Between rounds, a monster can switch to another weapon. However, the troll only has his club. Without a weapon, monsters suffer -1D to all actions.
MERRY
I stab at the troll furiously... trying to cause a distraction for Aragorn, Legolas, and the others.
GM
The troll drops his club, swatting at the pesky hobbits.
#3 Pippin Defend VS Cave Troll Attack
Pip plays the Defend to counter the assumed Attack that the GM reveals.
- This is a VS action. The higher number of successes wins by a MoS.
- Pip has a Health of 3, +9D help, +1D for his Foolhardy trait, and +2D from Gain Position. He doesn't have any Persona to Tap Nature.
- The Cave Troll has 5D Nature. -1D for the Impede and -1D for being weaponless.
- Pip rolls 5 successes.
- The troll rolls 3 successes on 3 dice.
- Pippin wins and has a MoS of 2. Gandalf gives one HP back to Sam and Frodo.
PIPPIN
The fool that I am, I jump on the troll.
Round 4
Gandalf hopes that Legolas can finish off the troll with his bow. He follows up with Gimli doing a Maneuver and Boromir doing an Attack. If those fail, he plans to use Aragorn's Defend in Round 5.
#1 Legolas Attack VS Cave Troll Attack
Aragorn describes his help as pulling on the chain of the troll to hold it back.
The hobbits go crazy with help. Sam slashes at the cave troll's knee.
The anticipation builds as everyone narrates their help.
- The bow turns this into a VS action. The higher number of successes wins by a MoS.
- Legolas has Fighter 6, gets +9D help, +1D for mustering his Brave trait, and spends a Persona to use tap his current Nature of +3D.
- The Cave Troll has 5D Nature and -1D for being weaponless.
- Legolas explodes two 6's to get 10 successes against the Cave Troll's 1.
- The Cave Troll loses all 9 HP.
GM
The cave troll topples with a thud... dead.
End of Conflict
SAM
Now that the beast is felled, I look to Frodo. "He's alive!"
FRODO
"I'm all right. I'm not hurt."
ARAGORN
"You should be dead!"
GANDALF
"I think there's more to this hobbit than meets the eye."
FRODO
I pull open my shirt to reveal a shimmering mail shirt under my tunic.
GIMLI
"Mithril! You are full of surprises, Master Baggins..."
The rest of the play continues with the post-conflict wrap up. The party has won without compromise. The GM describes the rest of the orcs running away - shrieking in fear. Triumphant for the moment, Gandalf leads the group ever onward to the next obstacle… the bridge of Khazad-dum!
Cave Troll artwork by Matt Gibeault